Remembrance

When I was young, attending the Remembrance Sunday parade as an Air Cadet was mandatory. I remember the cold November mornings, but it wasn’t emotional for me, aside from seeing people who had lived through it.

As an adult, the ceremony has more meaning. Over time, I’ve built a connection to the past, and watching war films often leaves me wondering why others don’t seem to feel the same impact. Whilst film is usually fiction, these events were real. These were real people, young men with families, whose sacrifices gave us the freedoms we enjoy today. Many from my generation and younger seem disconnected from that understanding. They don’t seem to have any more meaning that a character from a Marvel movie or a drawing of a Roman soldier in a book.

Whether films are accurate or not, it can leave you with something to think about and try to imagine the situation these people found themselves in. A powerful reminder for me comes from the final scene of Blackadder Goes Forth. Set in 1917, the series follows British soldiers in the trenches. We get to know them, their characters and realise they are individuals, each with complex lives – they are not just a number or a name on a cenotaph. In the end, they are sent over the top, and the scene fades from the chaos an incessant noise of gunfire and bombs on no-mans-land to a peaceful field of red poppies and birdsong. To me this means that whilst memories fade, this beautiful land we take for granted came at great cost. While not historically accurate, this scene makes the human cost of war painfully real.

Whilst many films were made about ww2 and to a lesser extent ww1, we’d do well to remember that terrible war atrocities are not the thing of the past we might like to think they are. In 2002, I visited Bosnia as part of the ICMP, working to repatriate the missing from mass graves. Seeing bodies wearing Nike trainers and and wearing watches that are still ticking made it clear these tragedies are not distant. All this made the film ‘Behind enemy lines’ set in the same region at the same time, very much more personal. Because no matter how the film may portray the human cost it actually doesn’t come even remotely close. This, along with recent conflicts in the Middle East, resonates even more deeply now that I have my own children.

It really is crucially important to try remember the fallen and also that peace is a fragile thing. We are fortunate to have lived here in the UK in a relatively peaceful time, but war still rages.

Aircraft Alternator Teardown

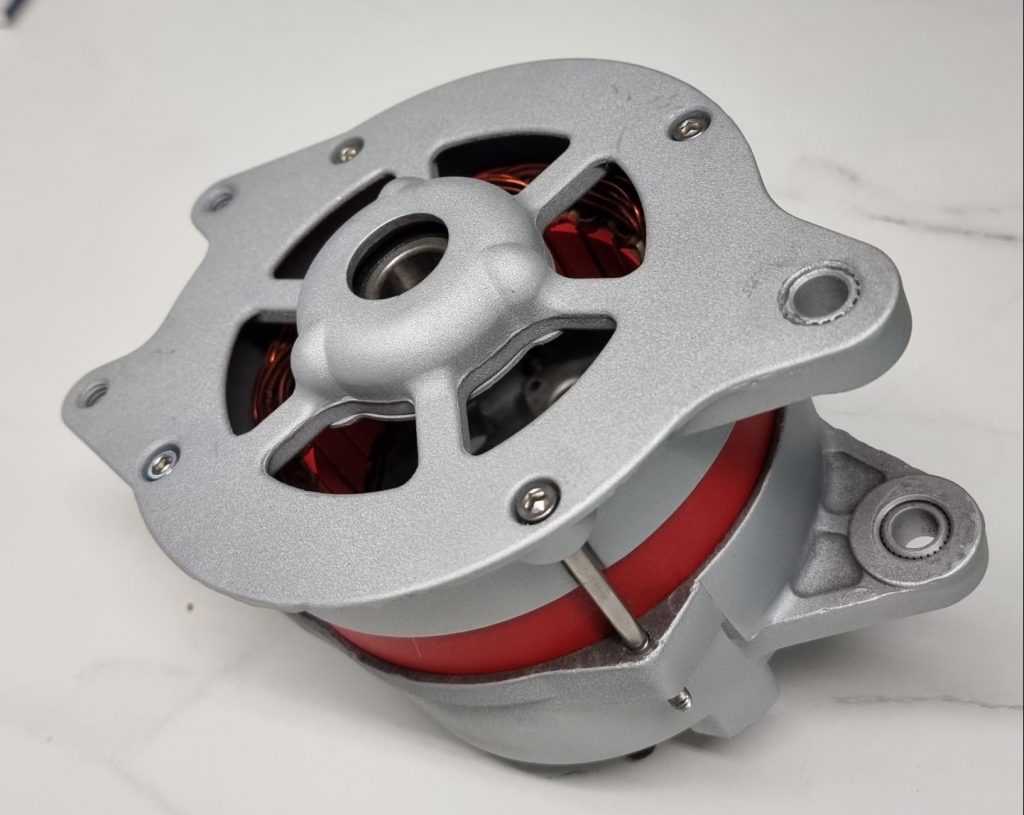
Before Overhaul, pretty crusty.

The aviation industry might make you think that aircraft alternators are made out of special materials, have been tested to impeccable standards and are manufactured on special production lines sprinkled with pixie dust. A normal engineer couldn’t hope to service one. The reality is that they are 1950’s or 1960’s American car (like Ford) alternators that wouldn’t stand up to the quality, power output or or rigours of a modern car alternator. Modern car alternators can produce a smooth output from 750 to 6000 rpm with little or no noise in the output because the tolerances and power electronics / frequency are far more advanced.

Mid overhaul, rotor shaft removed. The red ring is the laminated stator ring. The top casting has a simple sealed ball bearing and the rear casting contains a roller bearing. The through bolts contain 2mm holes cross-drilled at the end of the thread for lock wire. (actually the same alternator as first figure)

Basic Operation

Prestolite Maintenance Manual

The principle of operation is simple, a rotating magnet induces an alternating current in a stator winding (hence the name alternator) that is then rectified and delivered to the battery.

The figure above shows the schematic layout. The stator would work with a single coil but by arranging 3 at 120 degrees (equally around the circle) the sine waves from each phase sums to a smooth output. In theory it shouldn’t whine or produce large amounts of ripple or pulse. This 3-phase approach also doesn’t require a return path at the centre of all 3 connected coils because each phase works against the other two. The aux output (at the centre of the windings) isn’t required and can be left unconnected.

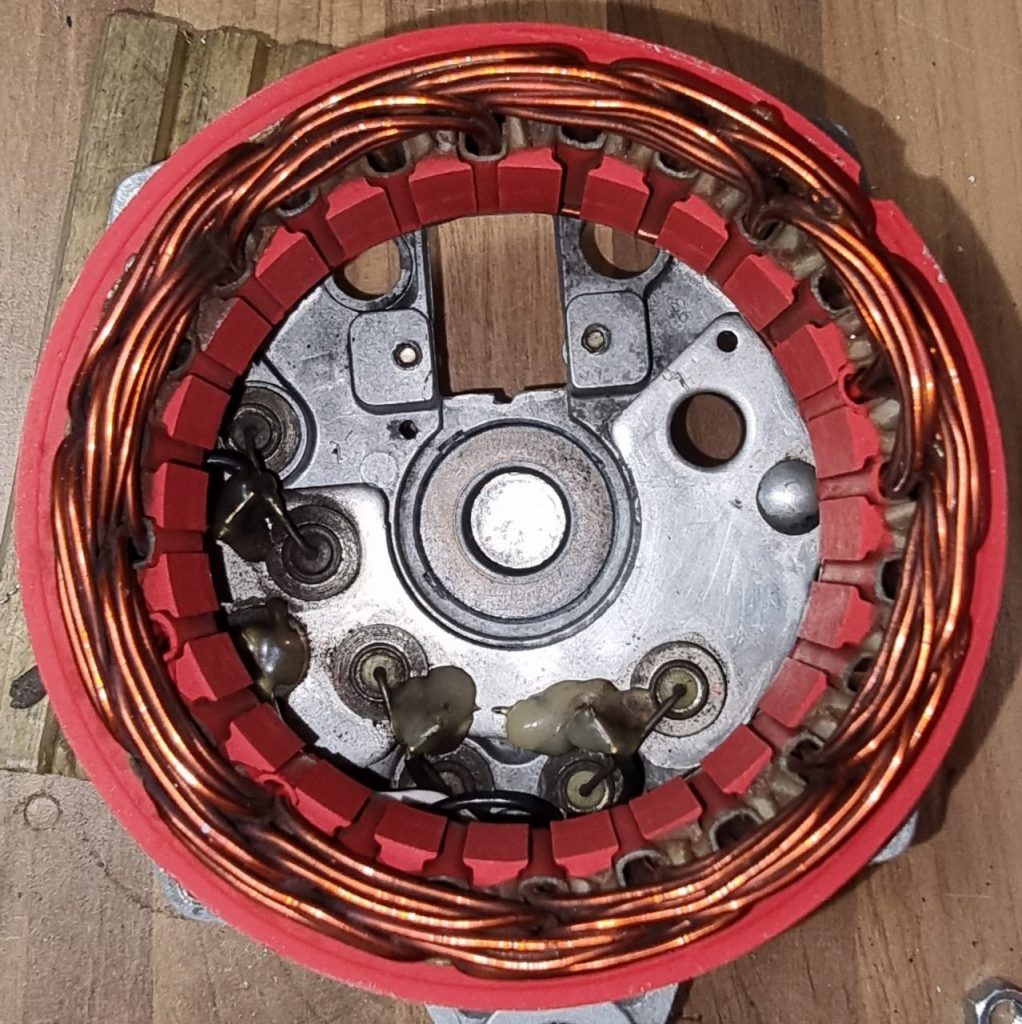
Stator windings. The bearing at the bottom. The stator is laminated steel which helps control eddy currents increasing efficiency. The round things are diodes of which there are 6 because its a 3-phase rectifier.
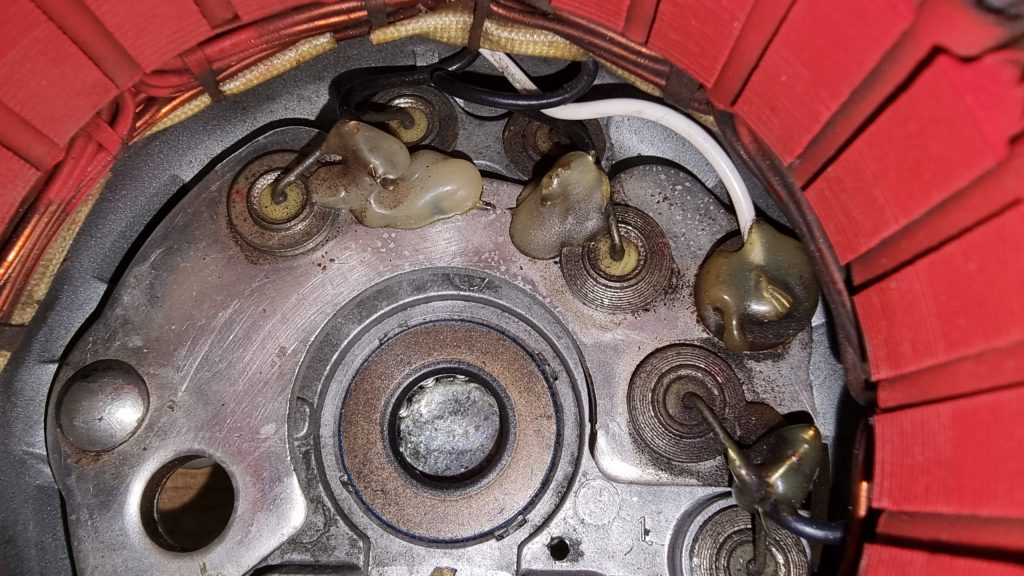
rectifier plate mounted at the end. The plate is the output of the positive end of the diodes which leave via the output terminal (left) the other 3 diodes go to ground which is the alternator casing (top two and bottom right). The white wire is tied to the centre of the 3 coils which leaves to the aux terminal which is isolated from the rectifier plate. One or two needle bearings are visible in the bearing (centre) and the black ring is an oil grease seal.

Regulation

We said that all we do is swing a magnet around in a coil to produce our output but obviously, there is more to it because that would overcharge the battery. If an alternator became detached from the battery, the output voltage may reach hundreds of volts.

Aircraft alternator regulators tend to be very simple on or off affairs and the electric regulators are in some cases mechanical. They are unreliable to the point that its typical to include an over voltage relay (OVR) which cuts off excitation completely if a preset output voltage is exceeded. For a 14V system this would typically be set to 16V. If the system reached 16V the relay will latch on turning the alternator off.

To regulate the alternator output we want a variable strength magnet in the rotor instead of a permanent magnet. In an alternator the rotor is an electromagnet and when the battery is low the strength of this magnet is high and when the battery is fully charged the magnet is its weakest and its the job of the regulator to control this. In a car this will be built into the alternator and it will use fast modulation of the rotor current in a closed control loop to produce an output that is always spot on. In an aircraft regulators tend to be separate units like they used to be in cars. In cars they stopped doing that because regulation control is poor, being affected by voltage drops, stray magnetic fields and radio interference as well as emitting radio interference all over the place. What normally happens when there is parasitic resistance is that the voltage will fluctuate, often oscillating, but even under the best situation its poor.

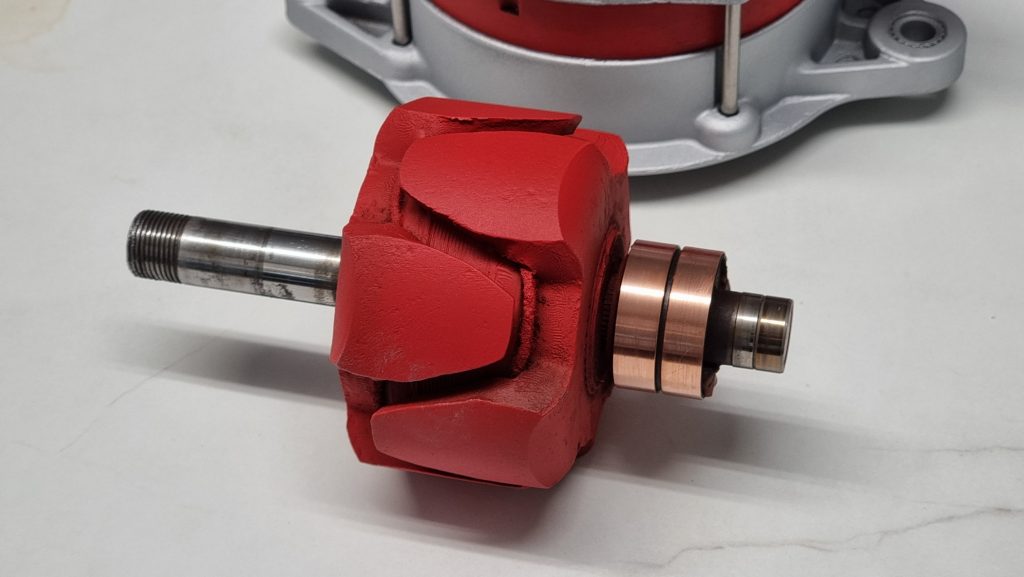
The rotor. The slip rings (copper coloured) connect a single winding axially wound around the centre former. The windings are visible.

An electromagnet is just a winding, and winding around an iron core concentrates the field. As such, the rotor is a single winding around an iron former. The two interlocking sets of fingers are opposing poles (each end) of the electromagnet which means that the rotor actually has alternating N-S-N-S… arrangement. As we can see in the picture, one finger is part of one end and the next finger is part of the other end. Just like the stator where there are multiple windings, there are multiple poles rotating in the stator which improves output power.

The problem of how to connect the windings is solved using slip rings where graphite brushes are pressed against the rings by springs to maintain contact. The graphite has good conduction, is hard wearing and also lubricating.

External Regulator

The external regulator is a sealed unit that essentially varies the current flowing through the rotor from terminal F to ground via the output transistor T3. If T3 is fully on, then F would be driven to ground providing full current, typically 2 – 4 Amps.

The heart of the regulator is a reference voltage. A zener diode has a fixed voltage drop across it which can be used to work out if our measured voltage is above or below a threshold.

When the system voltage connected to ‘I’ terminal reaches a value at which the Zener diode connected to the divider network conducts, current will flow from the ‘I’ terminal through Rl through Z1 causing Tl to conduct which diverts the base current of T2 flowing from ‘I’ terminal through R4 to ground, turning off T2 which turns off T3, de-energizing the rotor Winding. When the alternator output voltage falls to a value which permits Z1 to cease conduction, Tl will turn off which turns on T2 and T3, re-energizing the rotor winding. Filtering is provided by C1 which usually dries out and can’t be fixed.

This type of regulator is on or off but happens so quickly that the average current flowing through the rotor should be proportional to the charge current required and thus we can loosely refer to it as “regulating”.

Its fairly easy to bench test the regulator by using a variable bench supply, and a bulb in place of the field coil, if the voltage is below about 14 the bulb should be on and should go out as the voltage rises. You can vary the point slightly using a variable resistor (potentiometer) P1.

Self Preservation

Of course, the rotor windings are unlikely to always have perfect connection to the regulator due to the slip ring arrangement and because the rotor is a big inductor, the resulting field collapse when it becomes interrupted will induce large voltages which would rapidly result in the destruction of T3. To quench these spikes the designer has used a neon bulb L1. This is quite neat, a neon bulb will strike an arc at about 95V and will then clamp the voltage to about 60V. I would expect the bulb to have a hard time if the slip rings were dirty and I’m not sure how often they fail in practice.

In contrast a modern automotive alternator such as Bosch has solid state protection, diodes with larger breakdown breakdown voltages and much more robust transistors. This means regulator failure isn’t really a thing even if the output is shorted or reversed. The most common failure mode is bearing failure or salt water corrosion.

For aviation alternators regulator, wiring faults, poor earths, marginal batteries, diode and brush failure are all so common that if it were in a car it would fail every 50,000 miles or so – which is about what you’d expect from a 1950’s alternator.

Finally, although the output ought to be smooth because of the use of 3-phase the diodes do take some forward voltage to conduct so the current will suddenly kick-in when they become forward-biased, and this can caused a whine on the electrical system that may be heard on radios and amplifiers. So an output capacitor is typically fitted to the output terminal to ground usually around 2.2uF. These also dry out and should be replaced if a whine is heard and they can be doubled up to get 4.4uf if its still an issue. The suppressors supplied with Prestolite alternators are between 1 and 2.2uf but they have such a high ESR (effective series resistance) of 15+ Ohms that they might as well not have bothered.

ChatGPT will be the death of us

Future me will read this thinking you were right, why didn’t we stop it? Well, its one of those things like plastic, driving cars, climate change, the internet and TikTok – we know its bad but we’ll carry on with something until we can’t – thats the only way to stop it.

Basically, the charge is that AI in general will flood the internet so that we no longer know what is right, wrong or real anymore. Well here’s my problem, I’m already there.

I am not even sure if I am real anymore. I knew who I was, my place in the world and where I was going until about late 2016. After then, the world – sort of broke.

I mean, come on guys, the whole shebang since then has been totally off-kilter with anything that went before. I could be having a mid-life crisis but nobody I mentioned it to says, “you’re nuts”, more, “I think you might be right (and you’re probably also nuts, they aren’t mutual exclusive)”.

Zaon Flight PCAS MRX Teardown

Zaon MRX – Approx 1.9 miles – 500ft above descending.

The Zaon PCAS portable collision avoidance system is a very simple box which is considered as carry on – therefore requires no certification. Aircraft carry transponders which are interrogated by ground based radar and respond with a signal which may include height information. This is used to plot the aircraft on an ATC screen.

The Zaon device listens to the responses from nearby aircraft and estimates their distance from you based on signal strength. If the aircraft is transmitting height it will also show you that and if it is climbing or descending.

It prioritises the received aircraft and gives you a warning. It does not tell you in which direction it is – but its enough to add a level of safety.

Simple Design and Layout

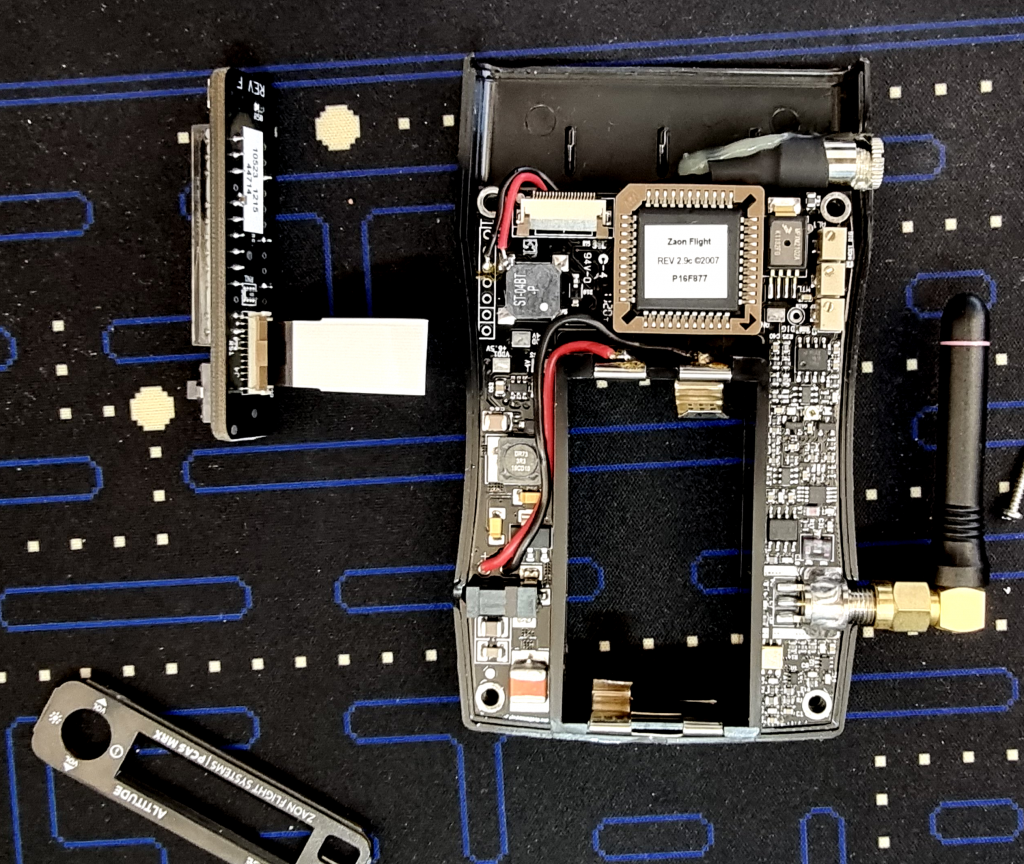
The main PCB is split into 3 distinct parts. On the left there is the power supply, its a buck-boost circuit which provides 3.3 from batteries that may below 3v. An external connector uses the same power supply and can operate up to 28V.

On the right there is a radio front end which operates on 1090Mhz, with basic decoding of mode C signals.

In the middle there is a microcontroller that does all of the processing and drives the display. My guess from the label P16F877 is that its probably a Microchip Pic 16F177 controller. I’m familiar with these from my past, they are a 40 pin controller with USB connectivity – you can see it does have 40 pins. These are still in production in 2022.

LED display

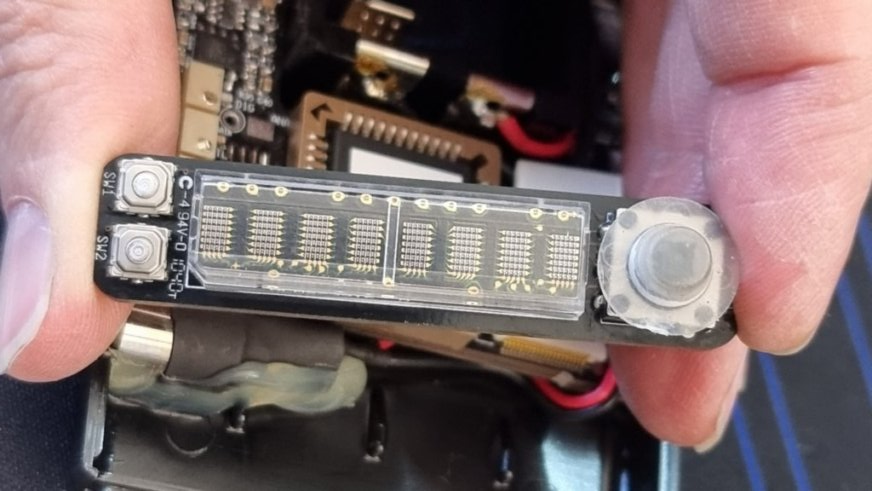
The only other point worthy of note is the display which is insanely bright. A broadcom device found here.

Sadly, Zaon no longer seems to exist but Garmin make an XRX version which gives quadrant directional information. But to be honest you can achieve the same today with a Raspberry PI and a software defined radio – which also allows you to decode ADSB.

Charging 2S lithium from 5V

Charging 7.4V what? no inductors?

I recently bought a toy car for my Son which has a 2S lithium battery and comes with a USB charger FTX Tracer Truggy. I couldn’t get the toy off him, so I bought my own monster truck version – but my charger had a flashing red light whereas his has green when charged with red when charging. So I thought mine was broken. (it wasn’t it was just a slight variation)

When I removed the case I was puzzled for a while how this works. The battery is a 2s battery which is nominally 7.4V. Normally if you want more than 5V you’re going to need an inductor or switched capacitor boost circuit. But there are none on here. Only a couple of tiny supply decoupling capacitors; so how does it work?

Why is it interesting?

Cheap Chinese non-balanced charger

Above is what happened in my living room a few years ago when charging a toy helicopter. This was a 7.4v/2s battery of 800mAh capacity. Even for such a small battery the fireball was huge and very hot. This is why I never leave them unattended. You can see that the battery charger has only 2 wires and so there cannot be any balancing. I now charge lithium polymer batteries in the kitchen – on the stainless steel stove top. That way, fire cannot spread, there’s a cooker hood to extract any fumes and in the worst case, the stove can be easily replaced.

Unlike older rechargeable batteries, lithium cells do not tolerate over-charging with the risk of spectacular explosions. So battery packs with a series (2s, 3s….) of cells can be charged in series but if one cell has a lower voltage than the others then serious problems result. Its not as easy as limiting the charge current with a resister like in the good old days of NiCads.

Charging Voltage vs Capacity

You need to switch from constant current to constant voltage at around 60% state of charge and each cell may have a different state of charge. Cheap chargers monitor each cell and terminate charging when any cell reaches 4.2V, so a cheap drill battery may seem to get less and less capacity until its useless, all you actually need to do is charge them all independently to restore its capacity.

A proper balance charger monitors each cell independently and prevents that an individual cell charging whilst continuing to charge the rest. This is not trivial because they are all still electrically connected together.

A proper balancer will provide a voltage that is at least 4.2V x <cell count> and whist charging will shunt each cell as it becomes full. This means that current bypasses the cell through the transistor Q1 – Q3 and continues to charge the remainers.

Typical Balancing Circuit

Shown above is a discrete (made from bits not a chip) self-balancing system. It uses a simple zener and transistor that starts to turn on as the cell approaches 4.2V, its adjustable per cell because components are never exact. Its great because it can’t really go wrong.

No Shunt, No voltage boosting

Microprocessor controlled charging

Taking a closer look at the charger, we see USB plug on the right with 5V available. On the left we see the 3 wires going to the cells, the centre wire being a tap between the cells. To the right of those wires we see 5 transistors. And the whole thing is controlled using an anonymous (no label) micro-controller. This left me puzzled for a bit but an hour later I worked out what it must be doing. Its charging one cell, then the other and the transistors are used to connect each cell to the charging “bus”.

You could do this one cell until full then the other – but if you were to then interrupt the charge, say in a RC car, then the flat cell would end up reverse charging and that would ruin it. A quick connection to a multimeter shows that the charger charges each cell for 1 second then switches to the other and back again continually until charged. This swapping batteries coincides with the flashing charge light. I think the charge current is limited by the large 100 Ohm resistor, and the micro controller will also be able to measure that. Since USB is 5V and a fully charged battery is 4.2V that leaves 0.8V to be dropped by the transistors and the current limiting resistor, which you can just about do with normal transistors which have a voltage drop Vce of about 0.3V. So that would be 0.3+0.3 leaving 0.2V drop on the resistor.

Overall, its a clever design and may have been obvious, might even be common with cheap toys that require more than a single cell – but I hadn’t seen it before.

My concern is referring to the charge vs. capacity graph – when charging and relaxing as opposed to continual charging, I think its much more difficult to detect when the battery is at 100%. So it probably doesn’t optimally get the last 10%. Having said that, pulsed charging and charging to 85% is usually good for the battery. In an EV or Hybrid Vehicle for example, the battery takes charge and discharge intermittently at any state of charge.

Another concern is that the micro-controller runs a software which can easily glitch or get stuck. You’d hope the software had a watchdog reset that resets it if it does but if it doesn’t then you could find that the circuit dumps 1.2A into one cell until it explodes. That cannot happen with the discrete design, for safety you probably want to see that the cell voltage can never exceed 4.2V but doesn’t look like here is any stuck protection, unless those big blobs that look like diodes on the output are 4.2V Zener diodes, such a thing does exist – but they appear to be marked ss34 which is basically a 3A shottkey diode to stop the charger being `driven` from the batteries.

Finally, if a lithium cell is over-discharged (below 2.5V per cell) you cannot whack a full charge current on to it to start charging, you need to charge at a low rate until the voltage recovers, then resume charging. Similarly, you must also take care charging hot batteries, its better to reduce the current or wait for it to cool before charging. A proper BMS (battery management system) will typically have temperature monitoring for that reason.

For all its cleverness – probably best to never leave it unattended.

3dD printed Cooler

Extra Cooling

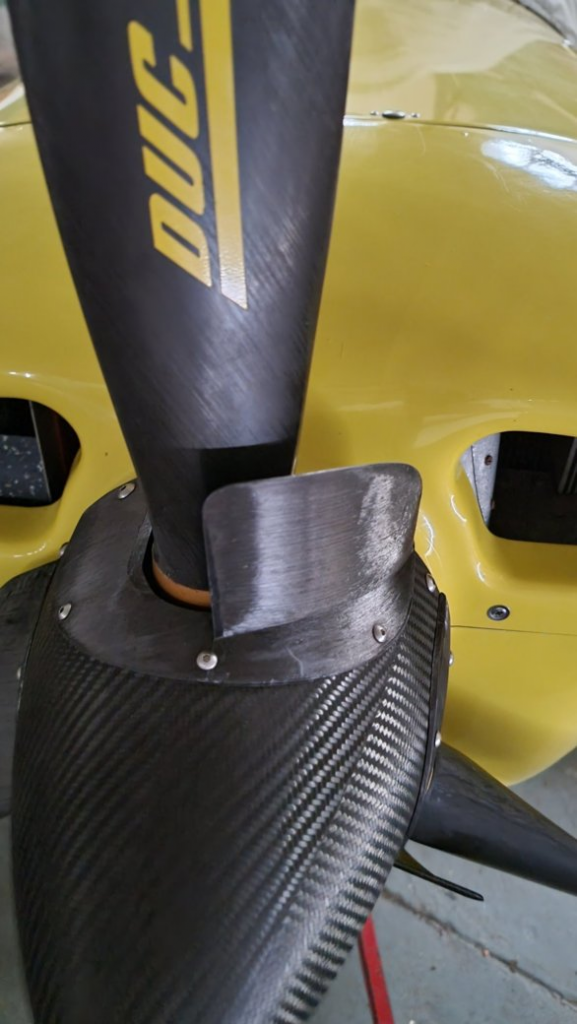
Not one of my crazy projects – looks like this aircraft needed some extra cooling so the owner has taken to creating an air pump at the root of the propeller. Normally there isn’t much going on there so seems reasonable.

What could possibly go wrong?

The print layering is weakest between layers so you could find it separates. At a maximum of 3000rpm thats probably unlikely but I would be checking it carefully for cracks and would have liked to have seen a lamination with the layering going 90 degrees.

If the blade does become detached, it could find its way directly into the intake entirely blocking it. That would be enough to overheat that engine and bring down that aircraft.

Last Wright’s

I don’t really know why I find this so astonishing.

April 26th 1944

“I guess I ran the whole plane for a minute but I let the machine take care of itself,” Wright said of the experience. “I always said airplanes would fly themselves if you left them alone.”
Wright also pointed out that the Constellation’s 123-foot wingspan was longer than the distance of his first flight, which had travelled just 120 feet.

Orville died January 30th 1948 aged 76.

By wallycacsabre – mig1, CC BY 2.0, https://commons.wikimedia.org/w/index.php?curid=59596165

I find it astonishing that he would have experienced the first powered flight and seen in his lifetime such dramatic developments. Prototypes like the MiG-15 and the B-47 flew in the month before his death.

DIY – ESP8266/Alexa Powered Smart Fish

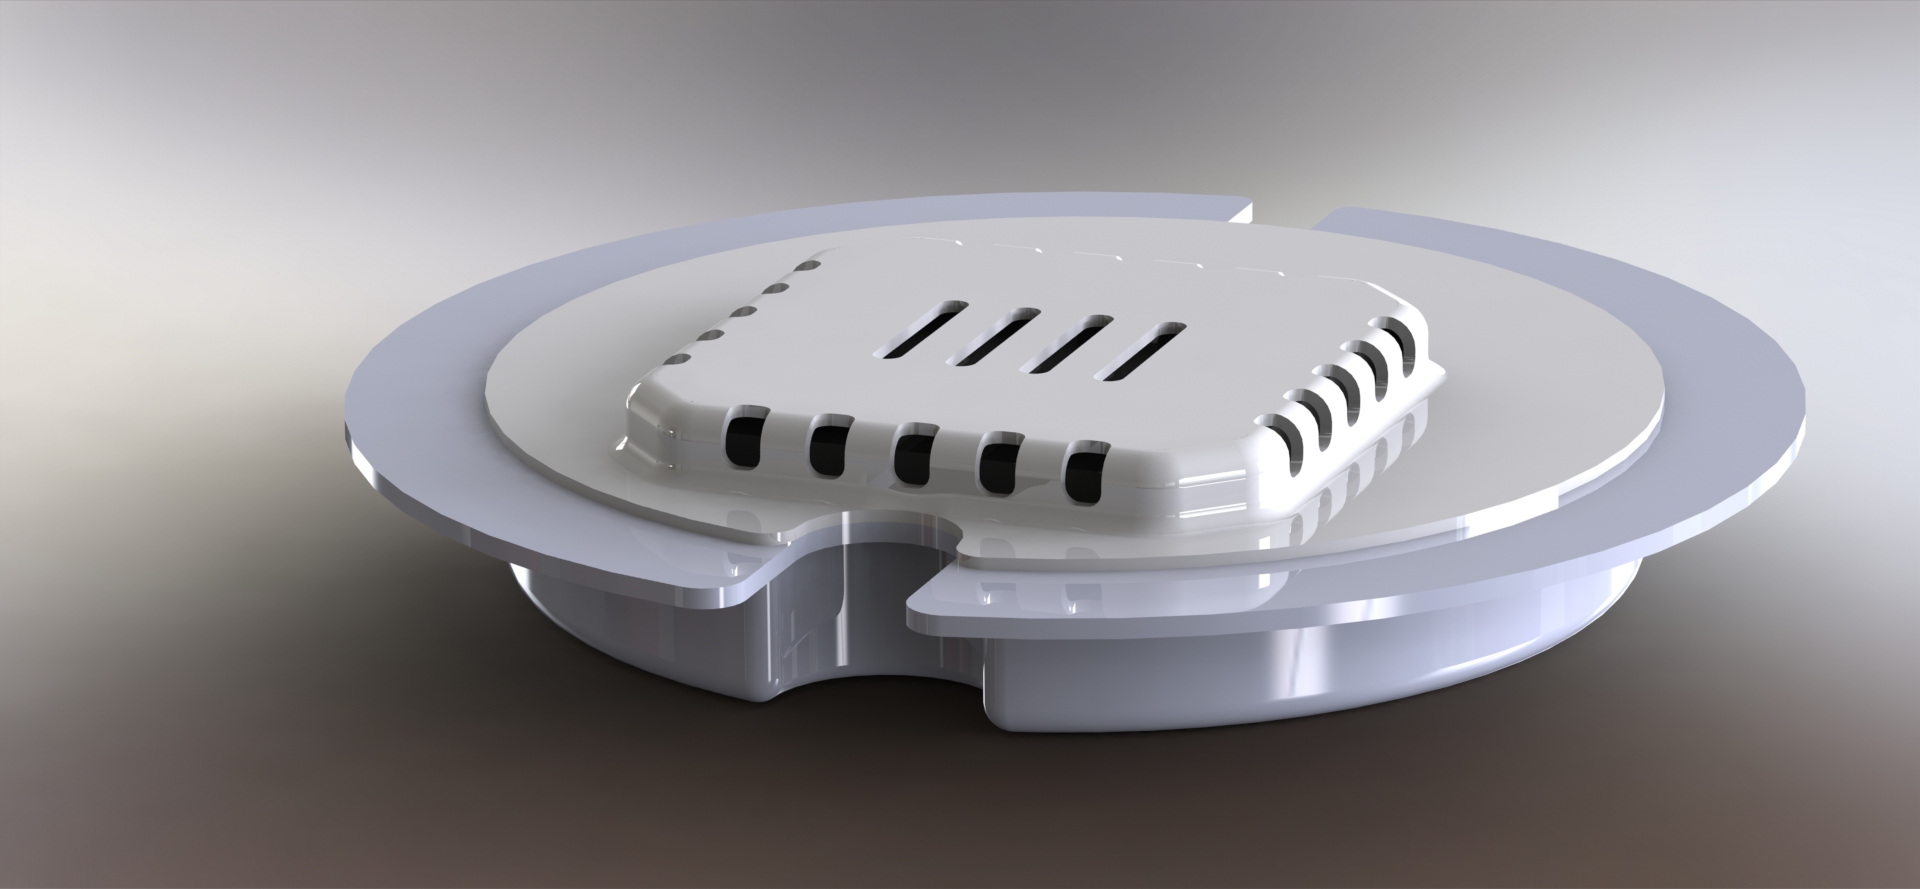
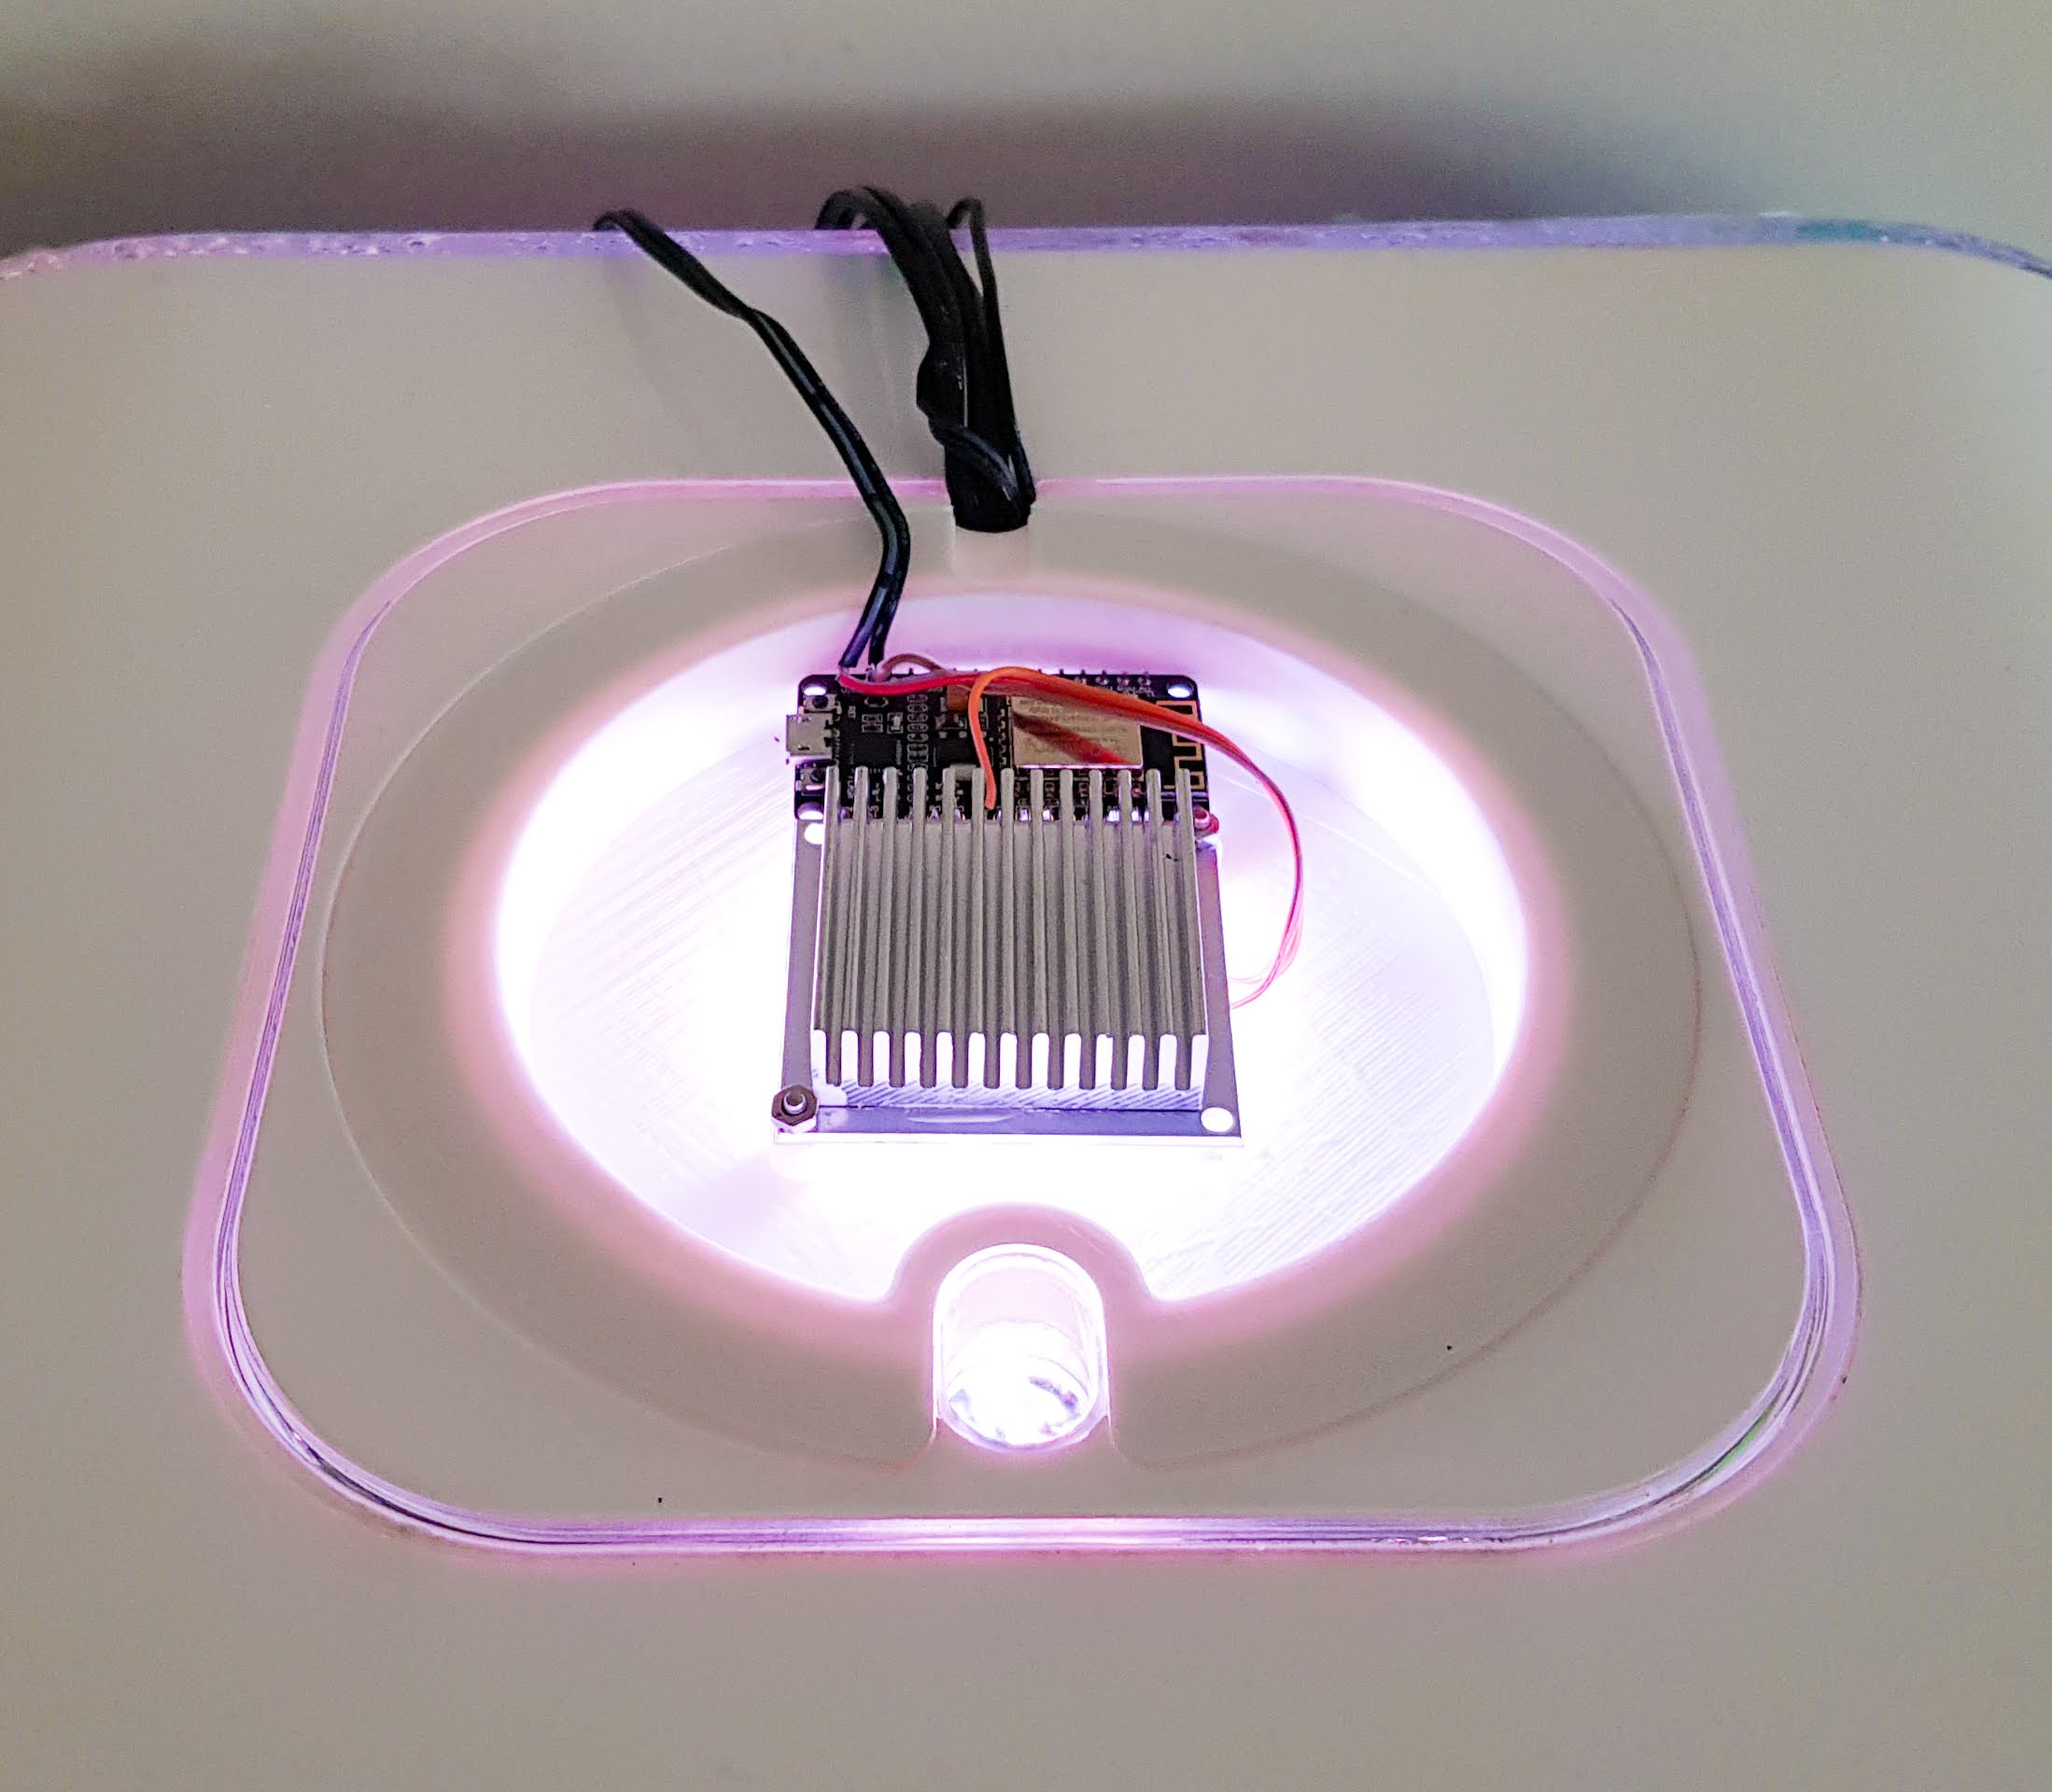
Smart Fish for a Smart Home – 3D Printed lamp housing.

If Apple made aquariums the Biorb Life tank is what it would be. Yes its modern but its also astonishingly expensive, £300 for something that really is worth no more than £50. But there we go, I have this ridiculous tank and I love it, now that the pain of paying for it is a distant memory. Unfortunately the Smart light at the top started flashing and causing me issues – presumably afte failure of one or more of the LEDs.

With Alexa you can set routines – like 30 mins before sunset turn Orange.

I looked at BiOrbs replacements and for the price of a small mortgage they have the Biorb MCR which offers any colour at the press of a button and it comes with a remote.

DIY Smart Lamp

Having made a number of projects using the ESP8266 wifi connected boards I thought I could make my own lamp if I could find a suitable LED and perhaps code up an app to change the colours.

Turns out its easier than that, with a little research all the building blocks are out there – if a little tricky to find out what they are called.

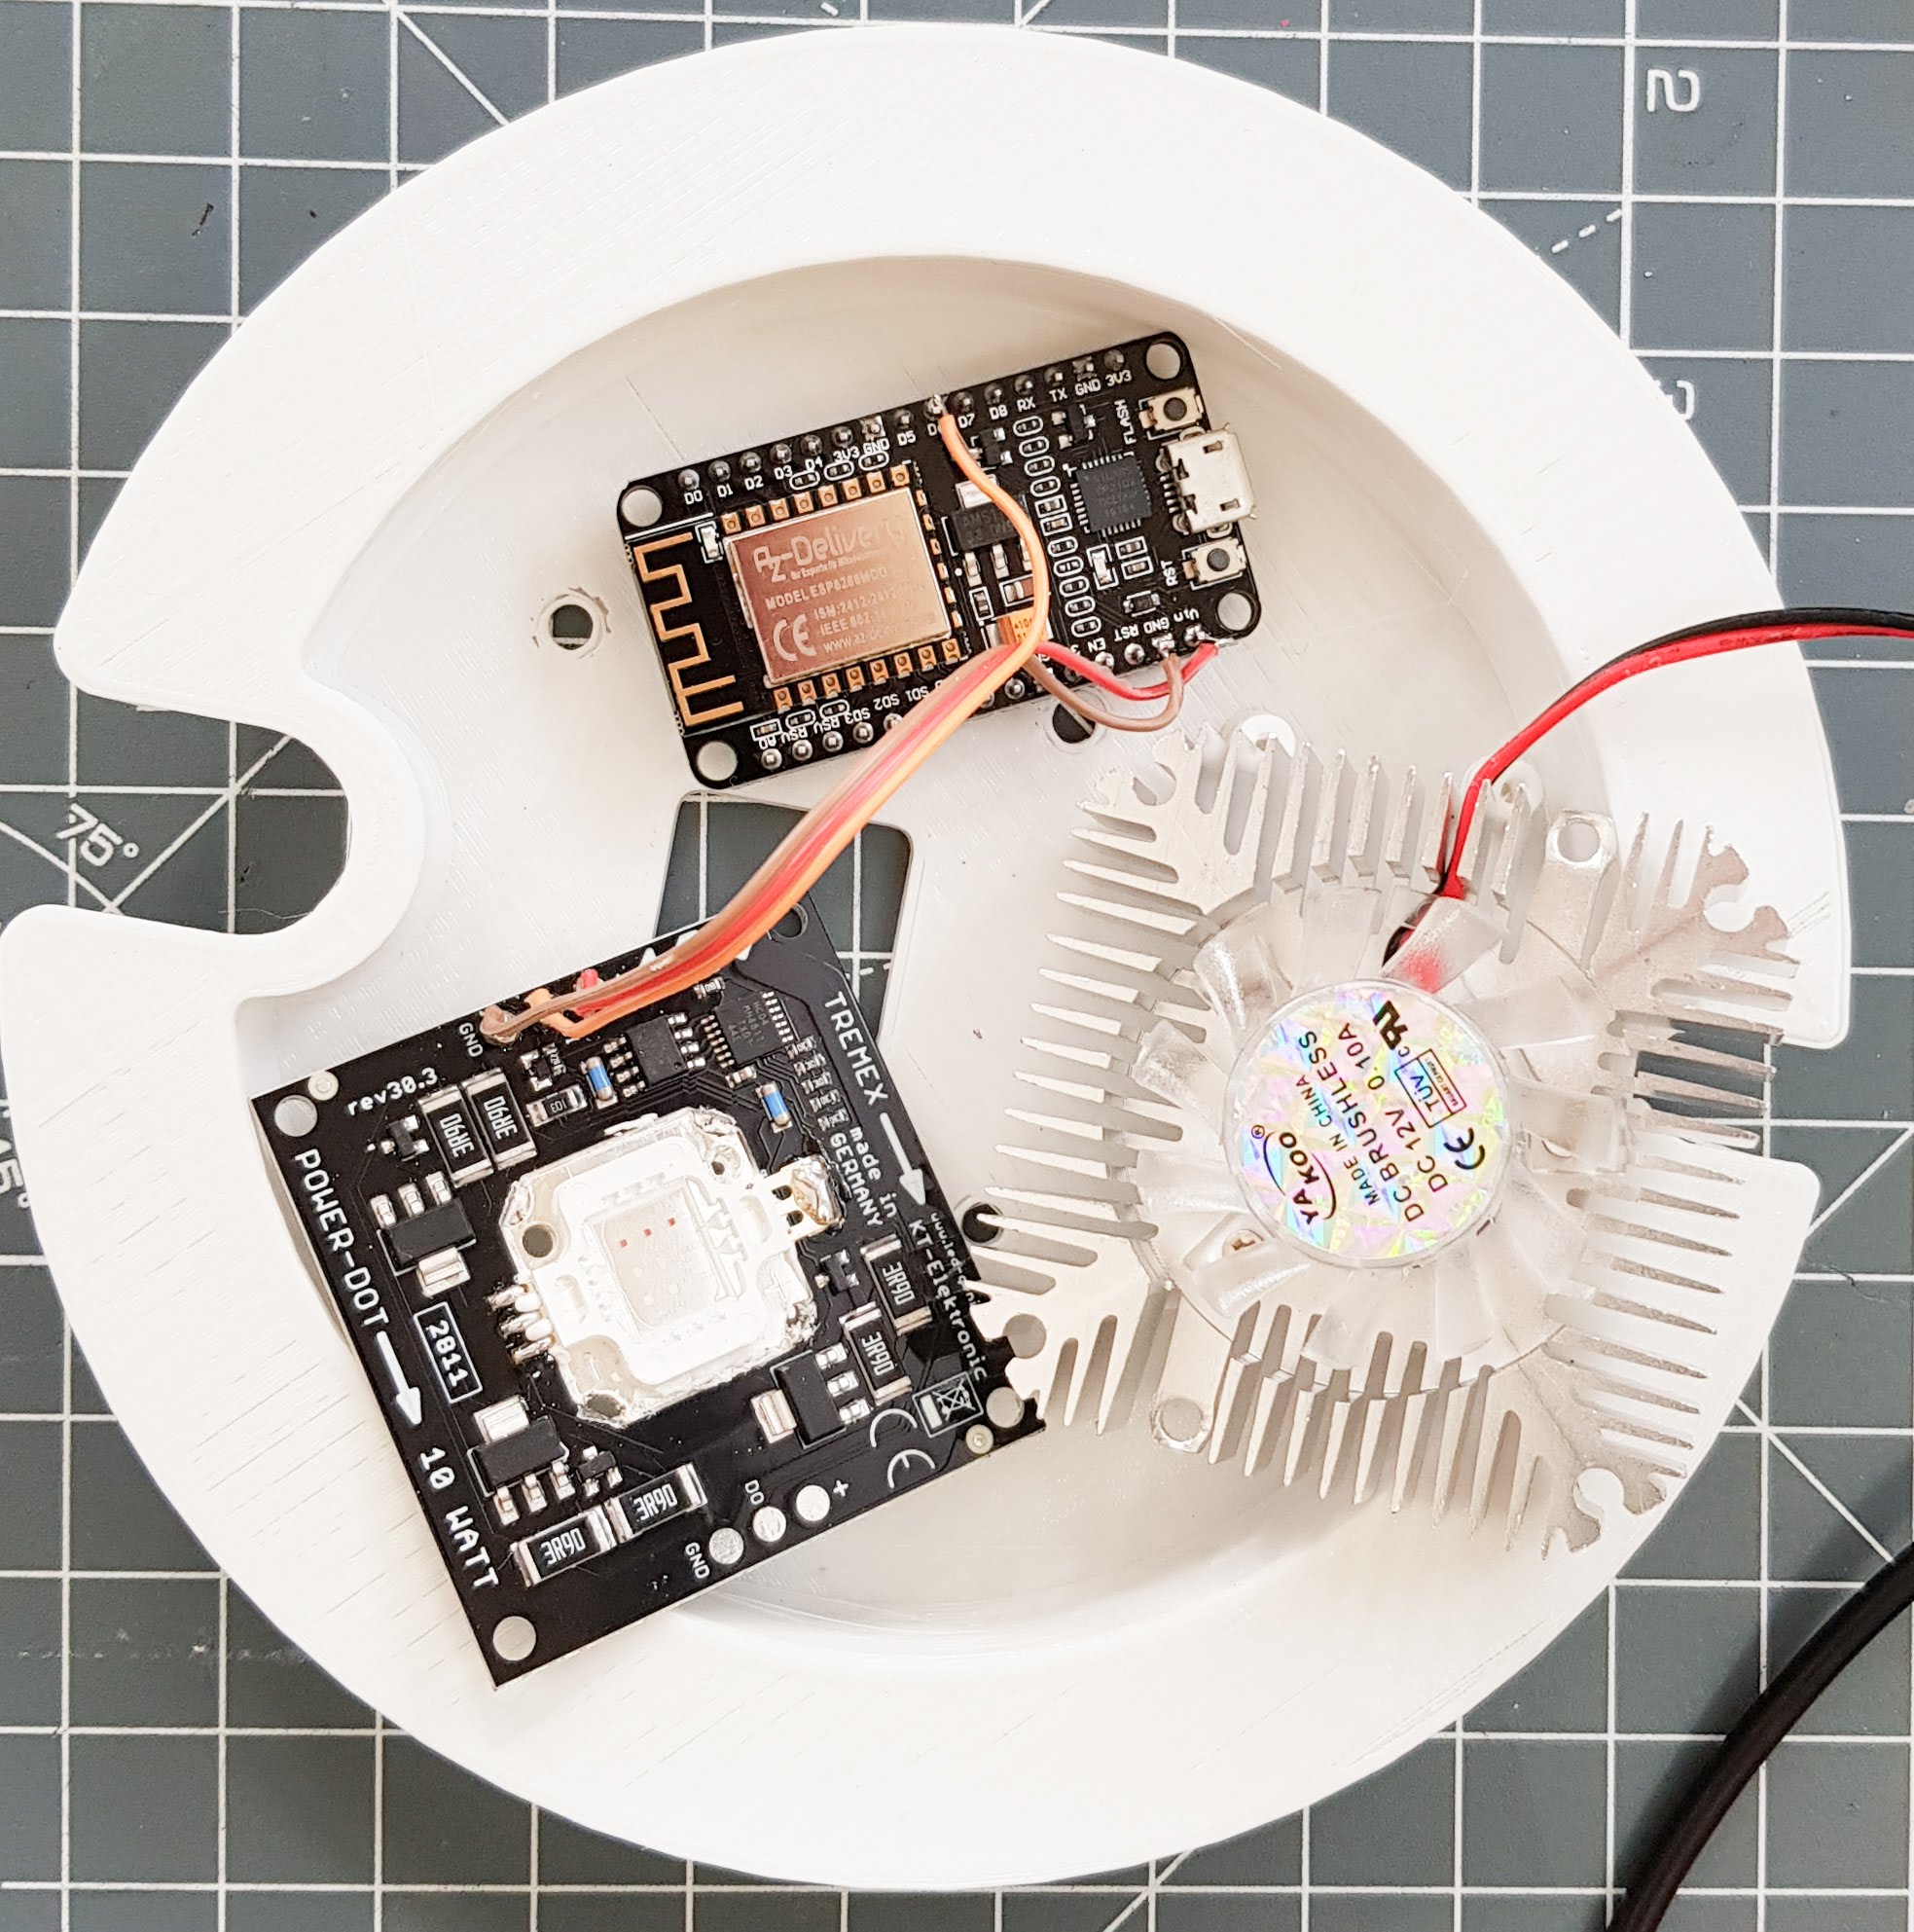
  • PowerDot 10W RGB LED – this was probably the most expensive part especially as I trashed the first one.
    • One issue I did encounter was that the blue stopped working and I thought this would be failure of the LED but it turned out that the solder was fractured, so simply re-flowing it with proper leaded solder fixed that.
  • ESP8266 – Generic, whatever happened to be on Amazon that day.
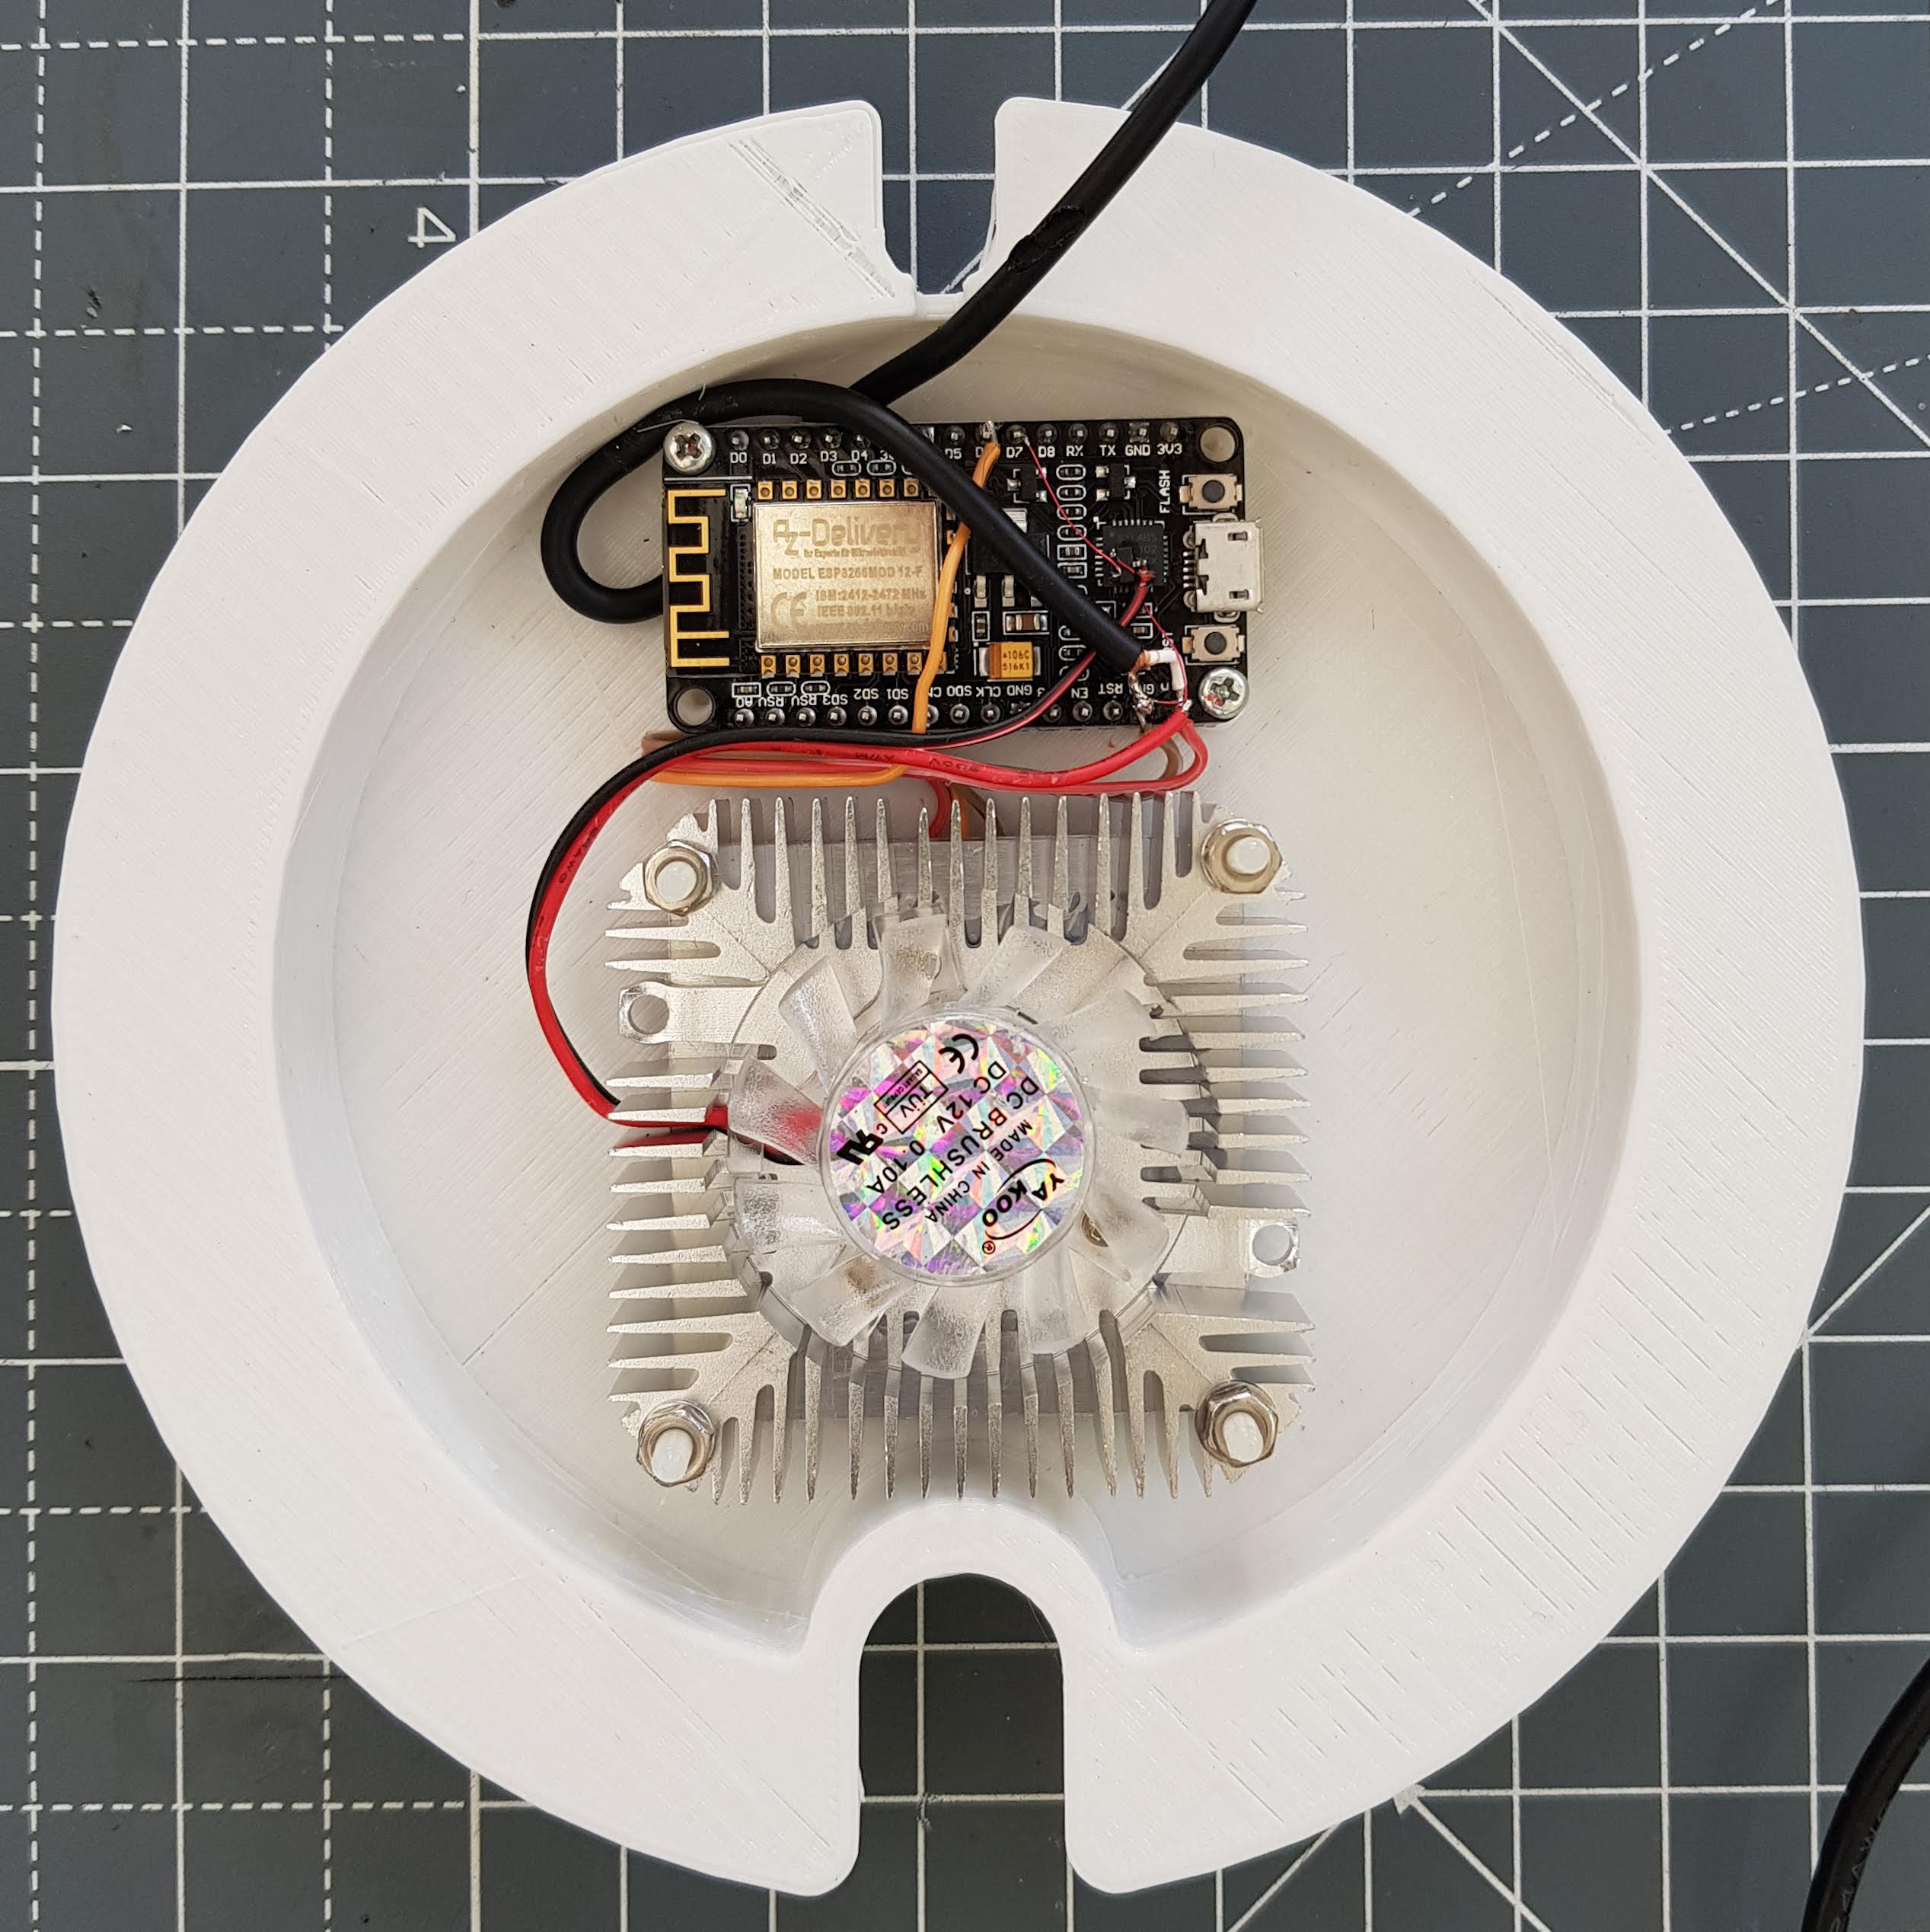
  • 40mm graphics fan
    • These are cheap and readily available.
  • 3D printed custom enclosure – I designed this is Solidworks in two parts that can be press-fitted together. I printed it in white PLA.
  • Software Libraries
    • Espalexa – library that simulates Philips Hue devices
    • FastLED – library that provides addressable LED functionality in addition to many colour utility functions, such as fading from one colour to another.
    • ESPAsyncWiFiManager – Generic library I always use instead of hard-coding the wifi credentials. This starts up a hotspot and then you can set the details using your phone.

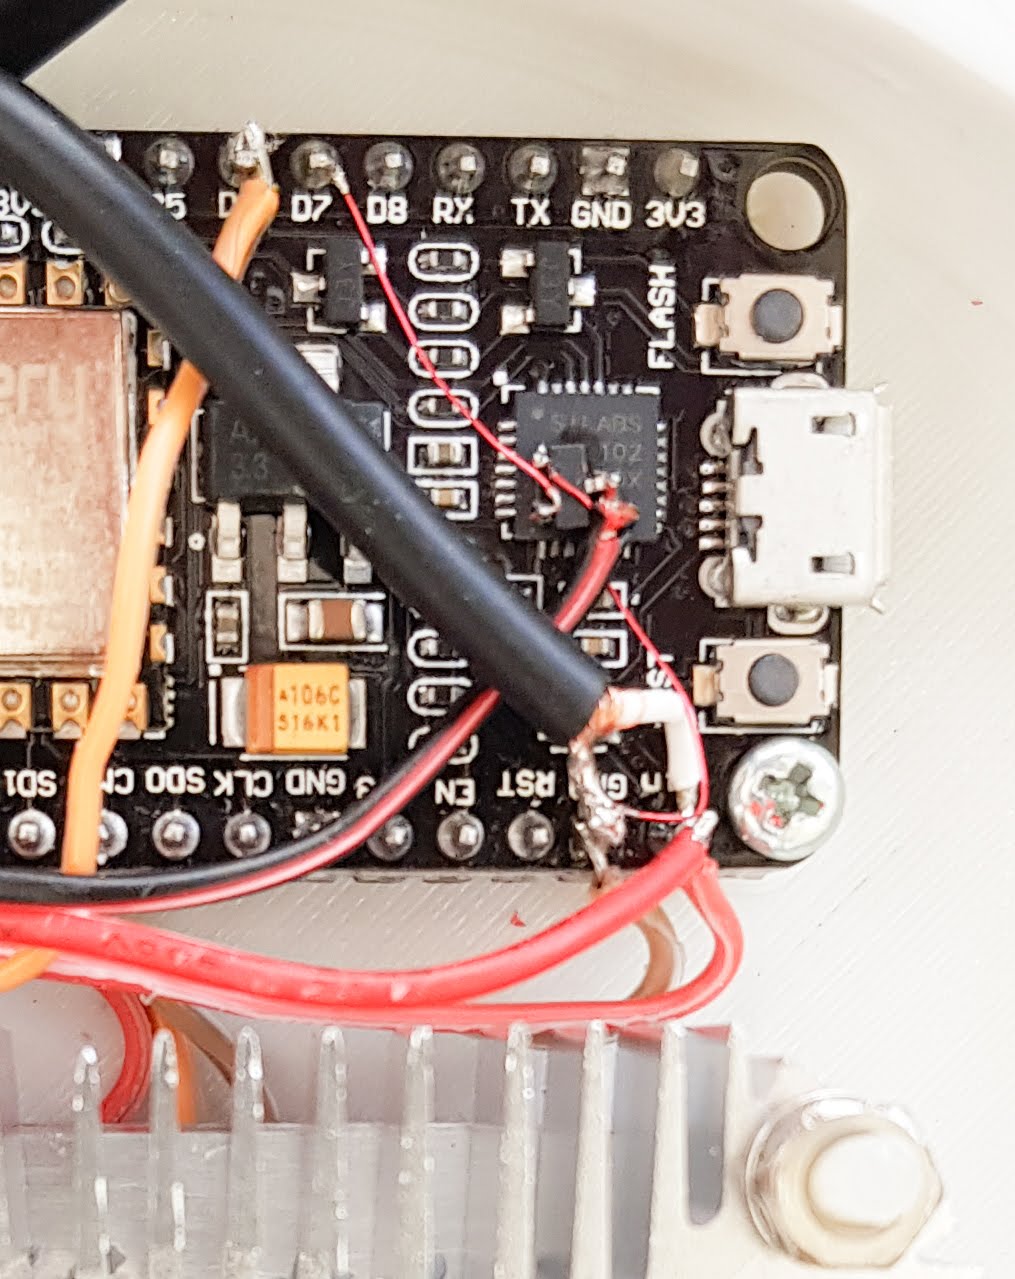
I wanted to prolong the life of the fan as much as possible as its a moving part in addition to keeping the noise as low as possible (Although the aquarium is noisy anyway with the pumps etc). So using the FastLED library you can work out the power dissipation of the current colour and brightness, I use this to produce a power factor between 0 and 1 and then use that to control the fan speed. In the end the fan starts to turn at 25% brightness and the maximum duty ratio is 40% of full power – so even at full chat its almost silent. The only exception is that on start-up I run the fan at full power for 5 seconds before reducing the speed to blow off the dust and give the bearings a good thrashing.

At night the fan isn’t required and in the day (8hrs) it runs at about 40%. I used an N-Channel logic level FET to control the fan speed. The fan is brushless and doesn’t really like being powered by PWM signal, so I created a simple RC filter, so the fan see’s an average voltage. This also stops it singing at the PWM frequency.

Alexa

Once you have configured the library, you use the Alexa app to search for your device – here I called it ‘Fish’ and it identifies as a Hue Colour device. You could also have just white, dimmable, colour tuneable etc.

You can set routines with Alexa and have the aquarium come on at a specific time, or sunrise if you like. I found it to be a little hit and miss because I have 3 different echo dots on different VLANs (I think that is the issue) – so for the initial turn on and off, I add a 2 minute delay and then repeat the command and that tends to work. It may be that we get a fix in the library at some point.

FastLED

FastLED is a great library, but to fade from one colour to another you need to working the the HSV colour space rather than RGB. The library finds the approximate closest HSV colour to what you have or want and fades smoothly. But it has issues with secondary colours. So orange looked green, magenta looked red. This was a pain as you didn’t get the colour you asked Alexa for unless it was White, or RGB. So in the end as there is only a handful of colours Alexa recognises I hardcoded them in so that it would translate on the device.

ESP8266 Limitations

The ESP8266 struggled with PWM and FastLED libraries at the same time, because its doing the PWM in software. So you saw random flashes of solid colour from the LED with occasional glitching when fading colours. What I did was to disable the FAN PWM when fading. You probably wouldn’t ever notice.

Retro METAR Clock

Time and Weather

As an aviator its important to know what the weather is doing and in my case whether there is an point tuning up to the airfield.

I had been toying with the idea of making a retro LED clock for some time, but as I now have to use an ESP8266 connected device for everything because its cheap and east to use, I thought I could add value by displaying the current METAR. A METAR is an aviation text encoded weather observation that really belongs 100 years in the past, but is still useful. It tells us what the wind is doing, the pressure, cloud and visibility. These are all available online in JSON requests or via many free API’s. So all we need to do is make a web request.

The ESP8266 does not have a real time clock, but it is able to sync with NTP (Network Time Protocol) and keep time that way. So all we really need is the ESP8266 and the LED display.

Two 4 panel LED displays is too large for my 3D printer so its made it two halves. Simple affair, there is no back but it includes screw hangars and a notch for USB entry.
To join the two LED panels, I used 5 wire links between them.
CDS light cell / resistor tacked on to the board allows sensing of ambient light levels. Other than that its all driven directly from the ESP8266, the USB powers everything.
  • ArduinoOTA – allows for it to be updatable over the air, essential when its screwed to the wall.
  • Adafruit GFX Library – required for the LED panel.
  • MegunoLink – used to filter the light sensor data to stop the brightness hunting.
  • ArduinoJson@5.13.4 – specific version required to parse the JSON web request for the METAR data.
  • WifiManager – to create a hotspot to allow the device to be configured.
  • Max72xxPanel – the shift register driver for the matrix panel.

Refinements

I found that the string class, although very powerful, can lead to heap fragmentation on the ESP8266. The forums are not terribly helpful basically saying that people should learn to use char arrays and pointers instead and stop being lazy. Whilst that may be true especially on a tiny process with a few kb of RAM its not helpful when leveraging 3rd party libraries, particularly the JSON class – you could do this manually but its unwieldy.

The solution I went for is to restart the ESP every 24 hours instead to clear up the memory. The LED display will just retain whatever it was showing whilst the restart fires, and it only takes a few seconds. I may revisit this and refine it a bit later, but for now its perfectly workable.

Clones

As it happens by word of mouth I have made quite a few of these. Its ironic that the most expensive part is a nice USB cable! There’s one at Flightpath flying school at Wolverhampton Halfpenny Green.